Bake Easy Stained Glass Cookies: Your Holiday Dazzling Treat Guide
As the holiday season draws near, the air fills with the promise of warmth, joy, and, of course, delicious baked goods. Among the countless festive treats, there's one that stands out for its breathtaking beauty and surprising simplicity: Stained Glass Cookies. These aren't just any cookies; they are edible works of art, transforming a classic buttery sugar cookie into a radiant, jewel-toned masterpiece. Perfect for Christmas celebrations, thoughtful cookie exchanges, or simply a fun winter baking project with family, their magic lies in a brilliant, straightforward technique. Imagine a "window" carved into the center of each cookie, filled with vibrant, crushed hard candies that melt into translucent panes of color as they bake, mimicking the glorious glow of real stained glass. Don't be intimidated by their intricate appearance; these stained glass cookies are surprisingly easy to create and offer an incredibly rewarding baking experience.
Get ready to infuse your holiday season with a touch of edible sparkle and create lasting memories around the kitchen. This comprehensive guide will walk you through every step, ensuring your dazzling treats are not only beautiful but also incredibly delicious.
The Enchanting Appeal of Stained Glass Cookies
What makes stained glass cookies such a beloved holiday tradition? It’s their unique blend of visual splendor and comforting flavor. The contrast between the golden, tender sugar cookie and the shimmering, jewel-like candy center is simply captivating. Each cookie becomes a miniature masterpiece, catching the light and adding a festive twinkle to any dessert platter or mantelpiece display. They evoke a sense of childhood wonder, reminiscent of festive church windows or sparkling ornaments. Beyond their aesthetic charm, they offer a delightful textural experience—a crisp cookie yielding to a chewy, sweet candy center. They're more than just a dessert; they're a conversation starter, a decorative element, and a testament to the simple joy of homemade holiday treats.
Essential Ingredients for Your Dazzling Dough
Success in baking often begins with understanding your ingredients. For these exquisite stained glass cookies, each component plays a vital role in achieving the perfect balance of flavor, texture, and structure. Here’s a detailed look at what you’ll need and why:
- Unsalted Butter (or Margarine): The foundation of any good cookie dough. Softened butter is crucial because it creams properly with sugar, incorporating air that leads to a lighter, more tender cookie. Unsalted butter gives you more control over the overall saltiness of the recipe. If using margarine, opt for sticks rather than tubs for better baking performance.
- Granulated Sugar: Beyond sweetness, sugar contributes significantly to the cookie's tenderness, helps achieve that desirable golden-brown edge, and creates a soft, melt-in-your-mouth texture.
- Vanilla Extract: This aromatic essence is a classic cookie enhancer. It adds a warm, sweet, and comforting flavor that complements the butter and sugar beautifully, elevating the overall taste profile. For an extra special touch, consider pure vanilla extract.
- Large Egg: Eggs act as a binding agent, holding the dough together and providing essential structure. They also contribute to the richness and a slight lift, preventing the cookies from becoming too crumbly.
- All-Purpose Flour: The primary structural component of your dough. Flour provides the body and shape for your cookies. Measuring it correctly (spooned into a measuring cup and leveled) is key to preventing dry or tough cookies.
- Baking Powder: A chemical leavening agent containing both an acid and a base. When activated by moisture and heat, it produces carbon dioxide gas, creating tiny bubbles that cause the cookies to rise slightly and achieve a lighter, more tender crumb.
- Salt: Often overlooked, salt is a flavor enhancer. It balances the sweetness of the sugar and vanilla, making all the flavors more pronounced and complex. Without it, cookies can taste flat.
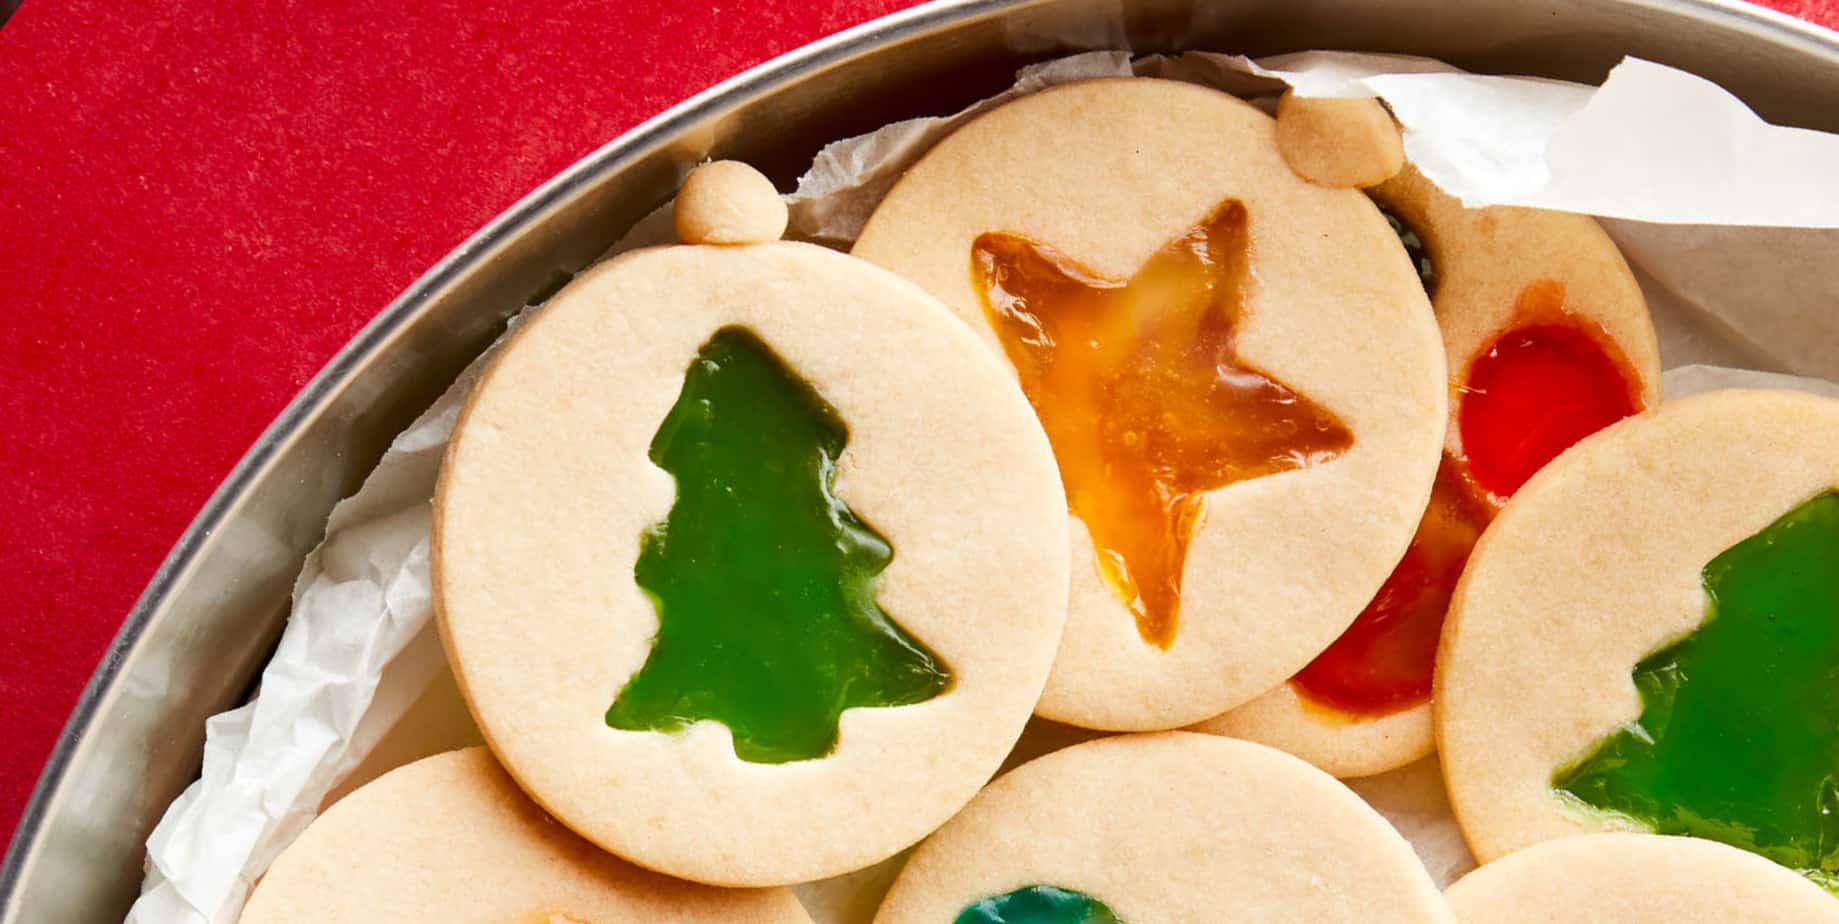
- Hard Candies (Ring-Shaped or Assorted): This is where the "stained glass" magic happens! Choose brightly colored, translucent hard candies like Jolly Ranchers, Life Savers, or even fruit-flavored hard candies. Avoid opaque or chewy candies. Ring-shaped candies are convenient as you can use the center for smaller windows, but any hard candy can be crushed. Consider mixing colors for a truly vibrant effect!
A Step-by-Step Guide to Baking Perfection: How to Craft Your Edible Art
Creating these dazzling treats is a joy, and the process is surprisingly forgiving. Follow these steps for perfect stained glass cookies every time:
1. Make & Chill the Dough: The Foundation of Flavor
In a large bowl, begin by creaming together your softened butter and granulated sugar until the mixture is light, fluffy, and pale yellow. This step is crucial for incorporating air, which contributes to the cookies' texture. Next, beat in the vanilla extract and the egg until fully combined. In a separate bowl, whisk together your dry ingredients: all-purpose flour, baking powder, and salt. Gradually add the dry mixture to the wet ingredients, mixing on low speed until a soft dough forms. Be careful not to overmix, as this can lead to tough cookies. Once combined, flatten the dough into a disk, cover it tightly with plastic wrap, and refrigerate for at least 30 minutes, or up to 2 hours. Chilling the dough makes it much easier to handle and, crucially, prevents the cookies from spreading excessively during baking, preserving those intricate shapes.
2. Roll, Cut, and Create Your Windows: Shaping the Masterpiece
Once your dough is thoroughly chilled, lightly flour a clean work surface and your rolling pin. Roll out portions of the dough to an even 1/8-inch thickness. Using too much flour can dry out your dough, so use it sparingly, just enough to prevent sticking. Use your favorite cookie cutters (stars, circles, gingerbread men, trees – let your imagination run wild!) to cut out your desired shapes. Now comes the "stained glass" part: using smaller cookie cutters or even a sharp knife, carefully cut out a "window" from the center of each larger cookie shape. Transfer these delicate cookie frames to baking sheets lined with parchment paper. Parchment paper is highly recommended as it prevents sticking and makes cleanup a breeze.
3. Crush and Fill the Candy: Adding the Dazzle
This step is often a favorite for younger helpers! Unwrap your hard candies and separate them by color if desired. Place candies of a single color into a sturdy zip-top bag (double-bagging is a good idea to prevent punctures) and use a rolling pin, meat mallet, or even the bottom of a heavy pan to crush them into small pieces. You want a mix of fine powder and small shards, but avoid large chunks as they may not melt evenly. Alternatively, a food processor can quickly achieve the desired consistency. Once crushed, spoon the colored candy pieces into the "windows" of your prepared cookie dough. Don't overfill, as the candy will spread as it melts. A slight mound is perfect. For a truly dazzling effect, consider mixing different colored candy shards within a single window, or create rainbow patterns!
For more inspiration on involving the family in this fun step, check out our guide on Crushed Candy Magic: Make Stained Glass Cookies with Family.
4. Bake to Brilliance: The Grand Reveal
Preheat your oven to 375°F (190°C). Bake the cookies for 7-10 minutes, or until the edges are lightly golden and, most importantly, the crushed candy has completely melted and appears smooth and glossy. Keep a close eye on them, as baking times can vary. Once baked, remove the baking sheets from the oven and allow the cookies to cool completely on the sheet before attempting to move them. This step is critical; the melted candy needs time to solidify and harden. If you try to move them too soon, the candy will still be liquid and could warp or break. Once fully cooled, the candy will be firm and beautifully translucent, creating that coveted stained-glass effect.
Tips for Success and Creative Variations
- Preventing Spreading: Beyond chilling the dough, make sure your butter isn't too warm when creaming, and avoid over-handling the dough.
- Candy Choice: Experiment with different candy types. Sugar-free hard candies can also work! For a unique flavor profile, some recipes suggest a cream cheese dough base with hints of ginger and nutmeg, adding a warm spice undertone to the buttery cookie.
- Troubleshooting Bubbles: If the candy bubbles excessively during baking, gently prick larger bubbles with a toothpick immediately after removing from the oven, while the candy is still molten.
- Storage: Store your stained glass cookies in an airtight container at room temperature for up to a week. Layer them with parchment paper to prevent sticking.
- Display Ideas: These cookies are almost too pretty to eat! Hang them as edible ornaments by punching a small hole at the top of the cookie before baking (away from the candy window). Once baked and cooled, thread with festive ribbon.
- Get Creative: Don't limit yourself to simple shapes. Use small cookie cutters to create intricate patterns within the candy window itself, or add edible glitter to the candy before baking for extra sparkle.
Baking stained glass cookies is more than just following a recipe; it's an opportunity to create something truly magical and memorable. The combination of a perfectly baked sugar cookie and the dazzling, jewel-toned candy windows makes these treats an instant showstopper at any holiday gathering. Whether you're a seasoned baker or just starting your culinary adventures, these cookies offer a rewarding and enjoyable experience, especially when shared with loved ones. So, gather your ingredients, unleash your creativity, and prepare to fill your home with the sweet aroma and sparkling beauty of these holiday delights. Happy baking!
