Unveiling the Radiance of Stained Glass Cookies: Edible Art for Dazzling Holiday Baking
Imagine a cookie that not only tantalizes the taste buds but also captivates the eye with its luminous beauty. Enter the world of stained glass cookies – an enchanting culinary creation that transforms a simple, buttery sugar cookie into a dazzling work of edible art. Perfect for festive celebrations, especially the winter holidays, these cookies mimic the intricate beauty of real stained glass windows, casting a colorful glow that’s nothing short of magical.
While their intricate appearance might suggest a challenging endeavor, the truth is, making stained glass cookies is surprisingly straightforward and incredibly rewarding. It's a fantastic project to share with family, where even the youngest helpers can get involved in the fun, especially with the exciting task of crushing candies. Get ready to create a memorable and delicious masterpiece that will light up your holiday season and impress everyone who beholds (and tastes!) them.
The Culinary Canvas: Understanding Your Ingredients
At the heart of every great cookie is a balanced recipe, and stained glass cookies are no exception. Understanding the role of each ingredient is key to achieving that perfect tender crumb and vibrant "glass" effect. Here's a deeper dive into the essential components:
- Sugar: More than just sweetness, sugar contributes significantly to the cookie's tenderness, browning, and soft texture. When creamed with butter, its crystalline structure helps create air pockets, leading to a lighter, airier cookie.
- Butter (or Margarine): Often the star for flavor and richness, softened butter is crucial. Creaming softened butter with sugar incorporates air, vital for a tender crumb and preventing dense cookies. While margarine can be used, high-quality butter offers superior flavor and texture. Ensure it's at true room temperature for optimal creaming.
- Vanilla Extract: This ubiquitous flavoring agent adds warmth, depth, and a sweet aroma that elevates the entire flavor profile of the cookies. Don't skimp on quality vanilla – it makes a noticeable difference.
- Egg: Eggs serve as essential binders, holding the dough together and providing structure. They also add richness and contribute to the cookie's overall texture, preventing it from crumbling excessively.
- All-Purpose Flour: The foundational ingredient, flour provides the main structure and substance of the dough. Using all-purpose flour ensures a good balance of protein for structure without making the cookies too tough. Measure carefully, preferably by weight, or spoon and level, to avoid over-flouring which can lead to dry, stiff cookies.
- Baking Powder: A chemical leavening agent, baking powder contains both an acid and a base. When activated by moisture and heat, it produces carbon dioxide gas, creating tiny bubbles that cause the cookies to rise slightly and become lighter and more tender. Ensure your baking powder is fresh for best results.
- Salt: A pinch of salt is a baking secret weapon. It balances the sweetness of the sugar and vanilla, enhancing and making the overall flavors more pronounced and complex. It also helps to strengthen the gluten structure in the dough.
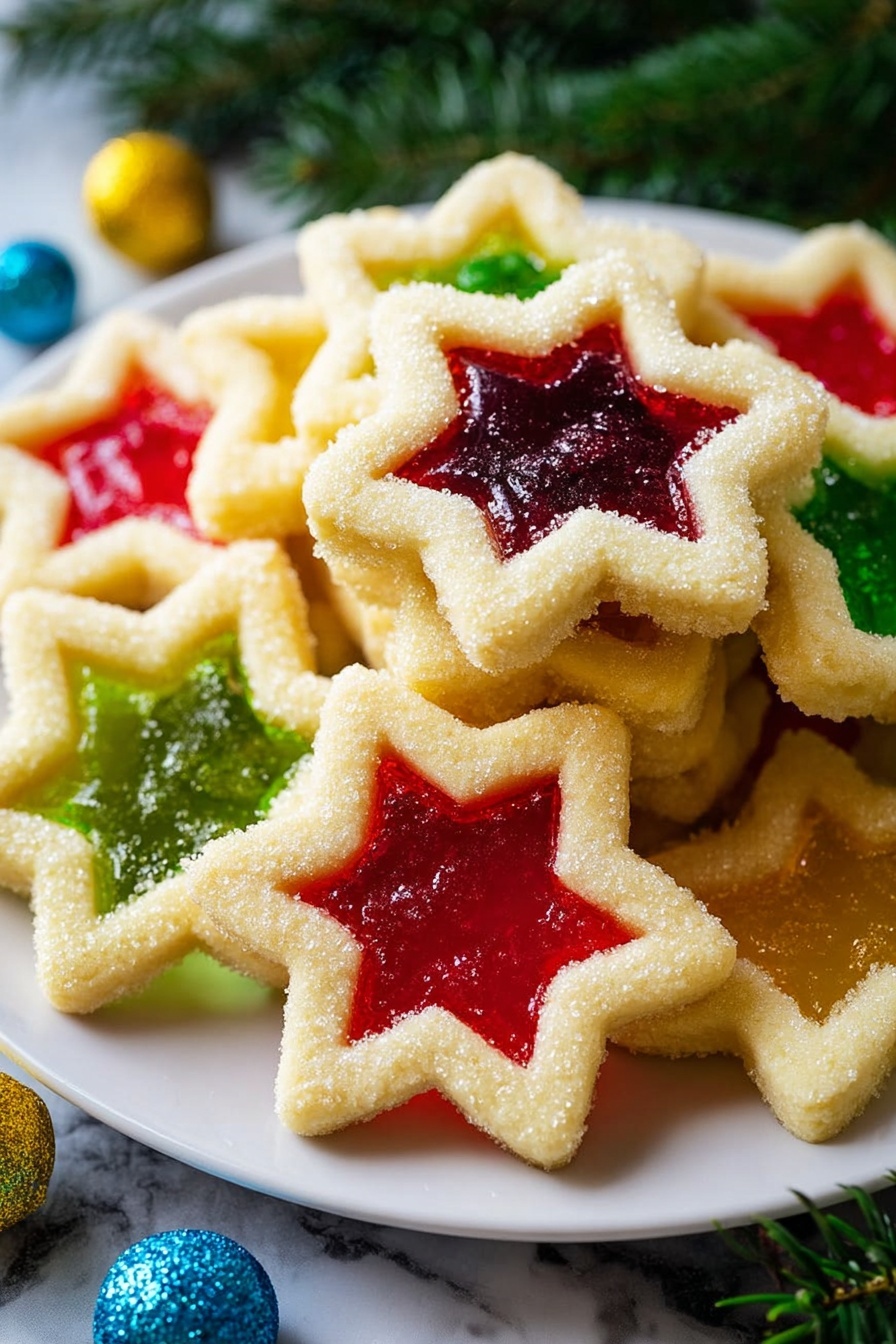
- Hard Candies: This is where the "stained glass" magic happens! Ring-shaped or individually wrapped hard candies (like Jolly Ranchers, Life Savers, or even crushed peppermints for a festive twist) are ideal. Their ability to melt into a clear, vibrant pane is what gives these cookies their signature look.
Mastering the Art: A Step-by-Step Baking Guide
Creating beautiful stained glass cookies involves a few distinct steps, each contributing to the final dazzling effect. While the process is straightforward, attention to detail ensures perfect results.
1. Preparing and Chilling the Dough
The journey begins with a classic sugar cookie dough. In a large bowl, beat together your softened butter (or margarine) and sugar until the mixture is light, fluffy, and pale in color. This creaming process is vital for incorporating air, which contributes to the cookies' tender texture. Next, beat in the vanilla extract and eggs until well combined. In a separate bowl, whisk together your dry ingredients: flour, baking powder, and salt. Gradually add the dry mixture to the wet ingredients, mixing until a soft, cohesive dough forms. Be careful not to overmix, as this can develop the gluten too much, resulting in tough cookies.
Once your dough is ready, divide it into two or three discs, wrap each tightly in plastic wrap, and refrigerate for at least 30 minutes, or preferably an hour. Chilling is a crucial step – it helps the butter firm up, preventing the cookies from spreading excessively during baking, and makes the dough much easier to handle when rolling and cutting.
2. Rolling, Cutting, and Creating the "Window"
Preheat your oven and prepare your baking sheets by lining them with parchment paper. On a lightly floured surface (or, even better, between two sheets of parchment paper to minimize additional flour), roll out portions of the chilled dough to an even 1/8-inch thickness. Consistency in thickness is key for even baking and proper candy melting. Too much flour on your surface can lead to dry, tough cookies, so use it sparingly.
Now for the fun part! Use your chosen cookie cutters to cut out desired shapes for the outer edge of your cookies. Festive shapes like stars, trees, bells, or classic circles work wonderfully. Carefully transfer these cutouts to your prepared baking sheets. For the "stained glass" effect, use smaller cookie cutters (such as tiny circles, diamonds, or even the tip of a knife for custom shapes) to cut out a "window" from the center of each cookie. Remove the inner dough scraps – these can be re-rolled with the remaining dough.
3. Crushing the Candies and Filling the Windows
This is where the colors come to life! Place your hard candies in separate zip-top bags according to color. Using a mallet, rolling pin, or even a heavy pan, crush the candies into small, coarse pieces. Avoid turning them into a fine powder; small chips melt more smoothly. For a quicker method, a food processor can also be used. This step is often a favorite for kids, adding to the holiday excitement. If you're looking for more guidance on this fun part, check out our guide on Crushed Candy Magic: Make Stained Glass Cookies with Family.
Carefully fill the cut-out "windows" of your cookie dough with the crushed candy pieces. Don't overfill, as the candy will spread as it melts. You can create single-color panes or mix and match colors for a truly vibrant effect. For example, fill a star with blue candy, or create a rainbow effect in a circular window by using a few different colors. Be mindful that darker candies might produce opaque results compared to translucent ones.
4. Baking and Cooling
Bake your cookies in the preheated oven according to your recipe's instructions (typically around 8-10 minutes, but ovens vary). Keep a close eye on them. The cookies themselves should be lightly golden around the edges, and the crushed candy should have fully melted into a smooth, translucent "glass." The candy will be extremely hot and molten when it comes out of the oven.
Allow the cookies to cool completely on the baking sheets. This step is absolutely crucial, as the melted candy needs time to harden and set. Attempting to move them too soon will result in broken "glass" and sticky messes. Once fully cooled, the candy will be firm and shiny, ready to sparkle!
Elevating Your Edible Art: Tips, Tricks, and Creative Twists
While the basic recipe yields stunning results, a few extra tips and creative ideas can elevate your stained glass cookies from beautiful to truly spectacular. For a comprehensive resource on making the process smooth and enjoyable, consult Bake Easy Stained Glass Cookies: Your Holiday Dazzling Treat Guide.
Troubleshooting Common Issues:
- Cookies Spreading Too Much: Ensure your butter is not too soft (or even slightly melted) before creaming. Always chill your dough thoroughly for at least an hour. Avoid adding too much baking powder.
- Candy Bubbling or Burning: If the candy bubbles excessively, your oven might be too hot, or you might have overfilled the window. A very gentle prick with a toothpick midway through baking can sometimes release trapped air. Ensure the candy layer isn't too thick.
- Candy Sticking to the Pan: Parchment paper is your best friend here! Never bake these directly on a greased baking sheet. If any candy spills onto the parchment, it can usually be peeled off once completely cool.
- Cookies Getting Soggy: Store your cookies in an airtight container at room temperature. If storing for more than a few days, moisture from the cookie can sometimes affect the candy. Placing a piece of parchment between layers can help.
Creative Flourishes and Variations:
- Dough Variations: While a classic sugar cookie is delicious, consider a hint of ginger and nutmeg for a festive gingerbread-stained glass cookie, or a cream cheese dough for extra tenderness and a subtle tang.
- Flavor Enhancements: Beyond vanilla, try adding a touch of almond extract for a delicate aroma, or a pinch of citrus zest to the dough for a bright counterpoint to the sweetness.
- Decorative Touches: After the cookies are completely cool, drizzle them with royal icing for extra embellishment. Edible glitter can be brushed onto the candy for an extra sparkle, or onto the cookie itself.
- Hanging Ornaments: Before baking, use a small skewer or toothpick to create a tiny hole at the top of some cookies. After baking and cooling, thread a ribbon through to turn them into beautiful, edible tree ornaments or gift tags.
- Color Combinations: Experiment with color theory! Combine complementary colors for bold contrast, or analogous colors for a harmonious blend. Clear candies with food coloring added to the crushed candy can also offer a custom palette, though this requires careful experimentation.
Beyond the Bake: Display and Enjoyment
Once your beautiful stained glass cookies have cooled and set, the real fun begins: showing them off! Arrange them on a holiday platter, creating a vibrant centerpiece that practically glows. Hang them on your Christmas tree as edible ornaments, or package them in clear bags tied with festive ribbons for charming homemade gifts. Their unique appearance makes them conversation starters at any gathering.
Ultimately, these dazzling treats are more than just cookies; they are a celebration of creativity, family, and the joy of the holiday season. The process of making them, from crushing candies to watching the "glass" melt, is an experience in itself, culminating in a delicious reward. So, gather your ingredients, enlist your helpers, and embark on the delightful journey of creating your own batch of edible stained glass art. Your holiday season is about to get a whole lot brighter and tastier!
